
How To Create a New User?
We have seen how to connect to the mysql server and create a new schema, now we will see how we can create a new user and grant permissions to that user.
Creating user using the MySQL workbench:
- Open the MySQL workbench and log in with the root user.
- Go to Server → Users and Privileges option.

- We will get the window as shown in the following image. Click on Add Account button as shown in highlighted part.

- We will get the window as follows. From the Login tab, we can add the user name in the Login Name option, Authentication type as Standard, host as localhost (if any other machine host then gives that), and, password.

- The second tab is for limiting the particular operations for that user. 0 means no limit. We can add any limit based on the requirements. For example, if we want to limit the user connection to 5 then we can add Max. connections as 5.

- In the Administrative Roles tab, we can select which privileges the user can have. If we don’t want to give all privileges to the user then we can add custom privileges by selecting required privileges from the Global privileges section as shown in the following image.

- We can also select the schema privileges for that users as follows. Selecting All Schemas will give access to the user for all database schemas available on that server.

- Once we select the option on the above image and click on Ok, we will get the following options where % will be added as schema and we can select the rights of the user on that schema from the Object Rights section.

- If nothing is selected then all objects will be selected by default.
- Once every configuration is done for that user click on Apply. The user will get created successfully once we click on apply.
Log in to the database with the new user using the workbench.
- Go to the home and click on add connection as shown below.
- Add the connect name. (We can give any name since this will be for our reference)
- Give the username as the user we created earlier which is ugt1.
- Click on Test connection and provide the same password added earlier for that user. Also, tick the checkbox to save the password in a vault so that no need to add the password again and again.

- Once the password is added, click on Ok. For a successful connection, we will get the success window popup as shown in the below image.
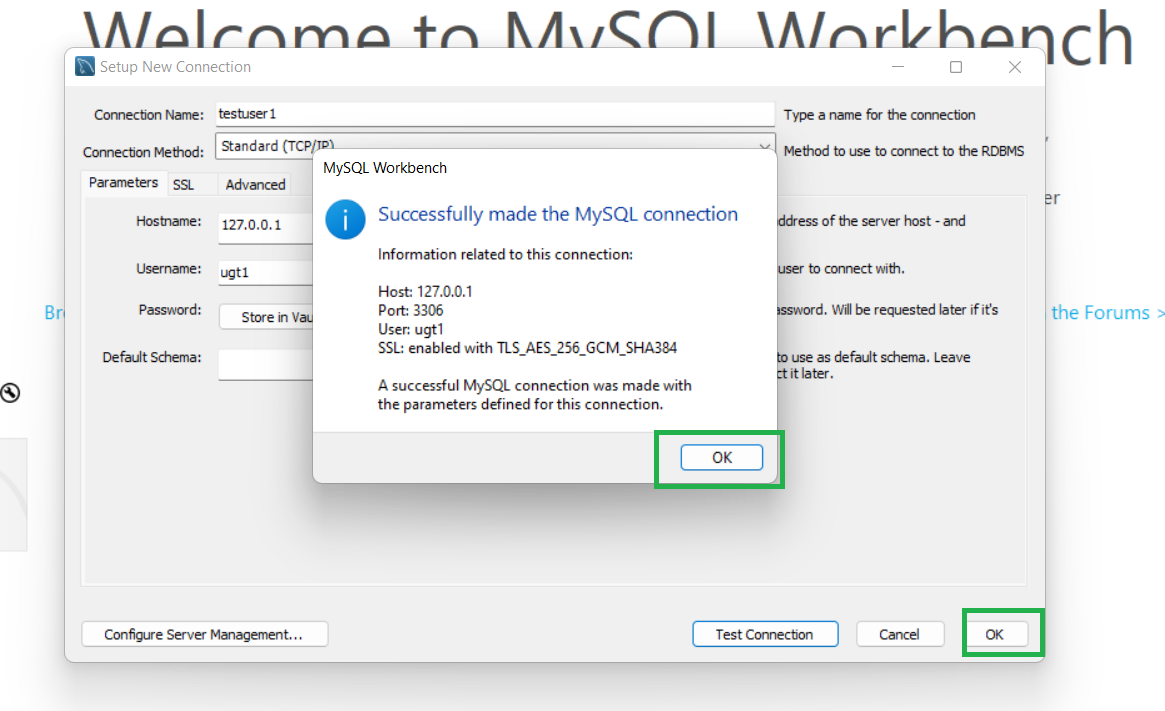
- Once the connection is successful click on Ok, and we will get the new option added for that user as shown in the below image. Double-click on that and we can able to connect to the database and perform operations like select/insert.


Delete the user by using the workbench
- For deleting the user, go to the same Users and Privileges option and select the user that needs to be deleted.
- Note that you have to log in with the root user or user who has the privilege to delete the user.
- Once we select the user we have the ‘Delete’ option as shown in the below image.

Creating user using the MySQL toolkit:
- Go to the command window and log in to the root user by using the following command.
mysql -u root -p- The MySQL toolkit will be opened as shown in the following image.

- Once the toolkit is opened run the following command to create a user.
CREATE USER 'ugt2'@'localhost' IDENTIFIED BY 'Welcome@123';- ‘ugt2’ is the user name, ‘localhost’ is the host for which we are creating the user and ‘Welcome@123’ is the password. We can change these things accordingly based on our requirements.

- Once the user is created we can check the privileges he has by using the following command.
SHOW GRANTS FOR 'ugt2'@'localhost';- We can change the privileges of that user according to the requirements. To give all rights to the user we can run the following command.
GRANT ALL PRIVILEGES ON *.* TO 'ugt2'@'localhost' WITH GRANT OPTION;- From the following image, we can see the all privileges given to the user.

- The Following command will revoke all the privileges from the user.
REVOKE ALL PRIVILEGES ON *.* FROM 'ugt2'@'localhost';
- We can also give custom privileges to the user by using the command as follows.
GRANT CREATE, ALTER, DROP, INSERT, UPDATE, DELETE, SELECT, REFERENCES, RELOAD on *.* TO 'ugt2'@'localhost' WITH GRANT OPTION;- We can add privilege options separated by a comma and grant those privileges to the user.
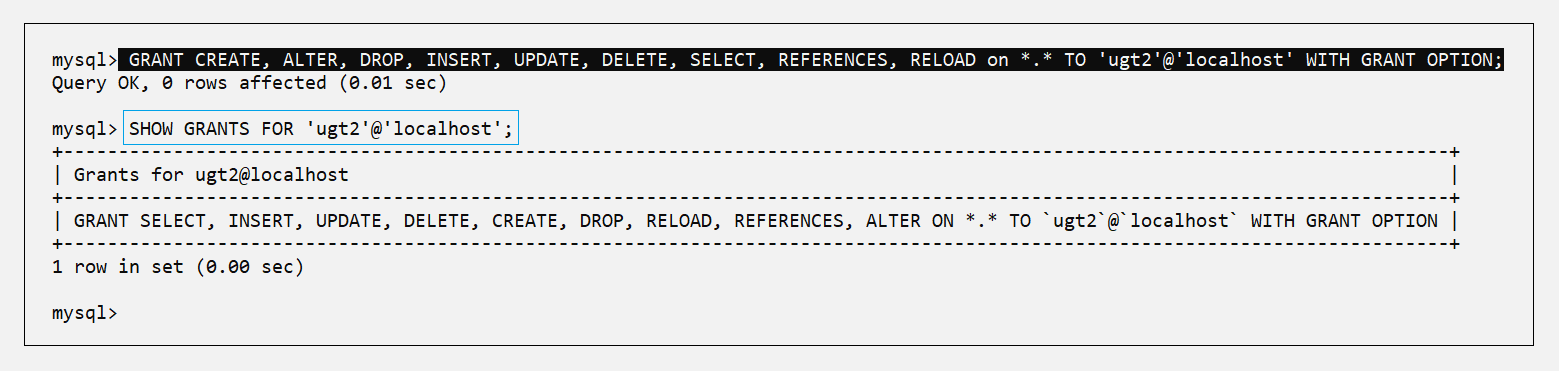
- If we want to Revoke any particular privilege option we can use the following command
REVOKE RELOAD ON *.* FROM 'ugt2'@'localhost';- As shown in the following image, before revoking, the user has RELOAD privilege access, but after revoking, this option is removed from the privileges.

Log in to the database with the new user using the toolkit.
- To log in with the newly created user, we can exit from the toolkit using ‘exit;’ and re-login with the user using the following command.
mysql -u ugt2 -p- Here ‘ugt2’ is the user name. Once we use the command and enter it will ask for the password. Give the same password which was provided while creating the user.
- Once we are created successfully we can do the select/ insert operations based on the user privileges.

Delete the user by using the toolkit
- To delete the user from the server we can use the following command.
DROP USER 'ugt2'@'localhost';